

Email Studio is SFMC’s core email creation and sending tool. It is where you build templates, manage content, configure sends, and track campaign performance — everything from a one-off promotional email to a complex triggered send at scale.
This guide walks through how to use Email Studio in practice, assuming you already have an active SFMC account with sender authentication configured. If you are starting from scratch, see our SFMC setup guide → first.
What Email Studio Does in SFMC
Email Studio sits inside Content Builder and Email Studio tabs in your SFMC navigation. It covers four main areas:
- Content Builder — where you create and store email templates, content blocks, and images
- Subscribers & Lists — where you manage your audience, lists, and data extensions
- Send Flow — where you configure, schedule, and send email messages
- Tracking — where you monitor campaign performance after send
Each area is covered step by step below.
Step 1: Create Your Email in Content Builder
Navigate to Content Builder from the top SFMC navigation. Click Create → Email Message and choose your starting point:
- Template — start from a pre-built layout
- HTML Paste — paste custom HTML for full control
- Text Only — plain text email with no HTML
For most marketing emails, start with a template and customise it. Content Builder’s drag-and-drop editor lets you add, remove, and reorder content blocks — text, images, buttons, dynamic content — without touching code.
Naming and Organising Your Email
Before saving, name your email clearly using a consistent convention — for example: [Campaign]_[Audience]_[Date] such as WelcomeSeries_NewSubscribers_2026-06. Store it in the correct folder in Content Builder. Folder structure and naming conventions matter more than they seem — an ungoverned Content Builder becomes unusable within 12 months.
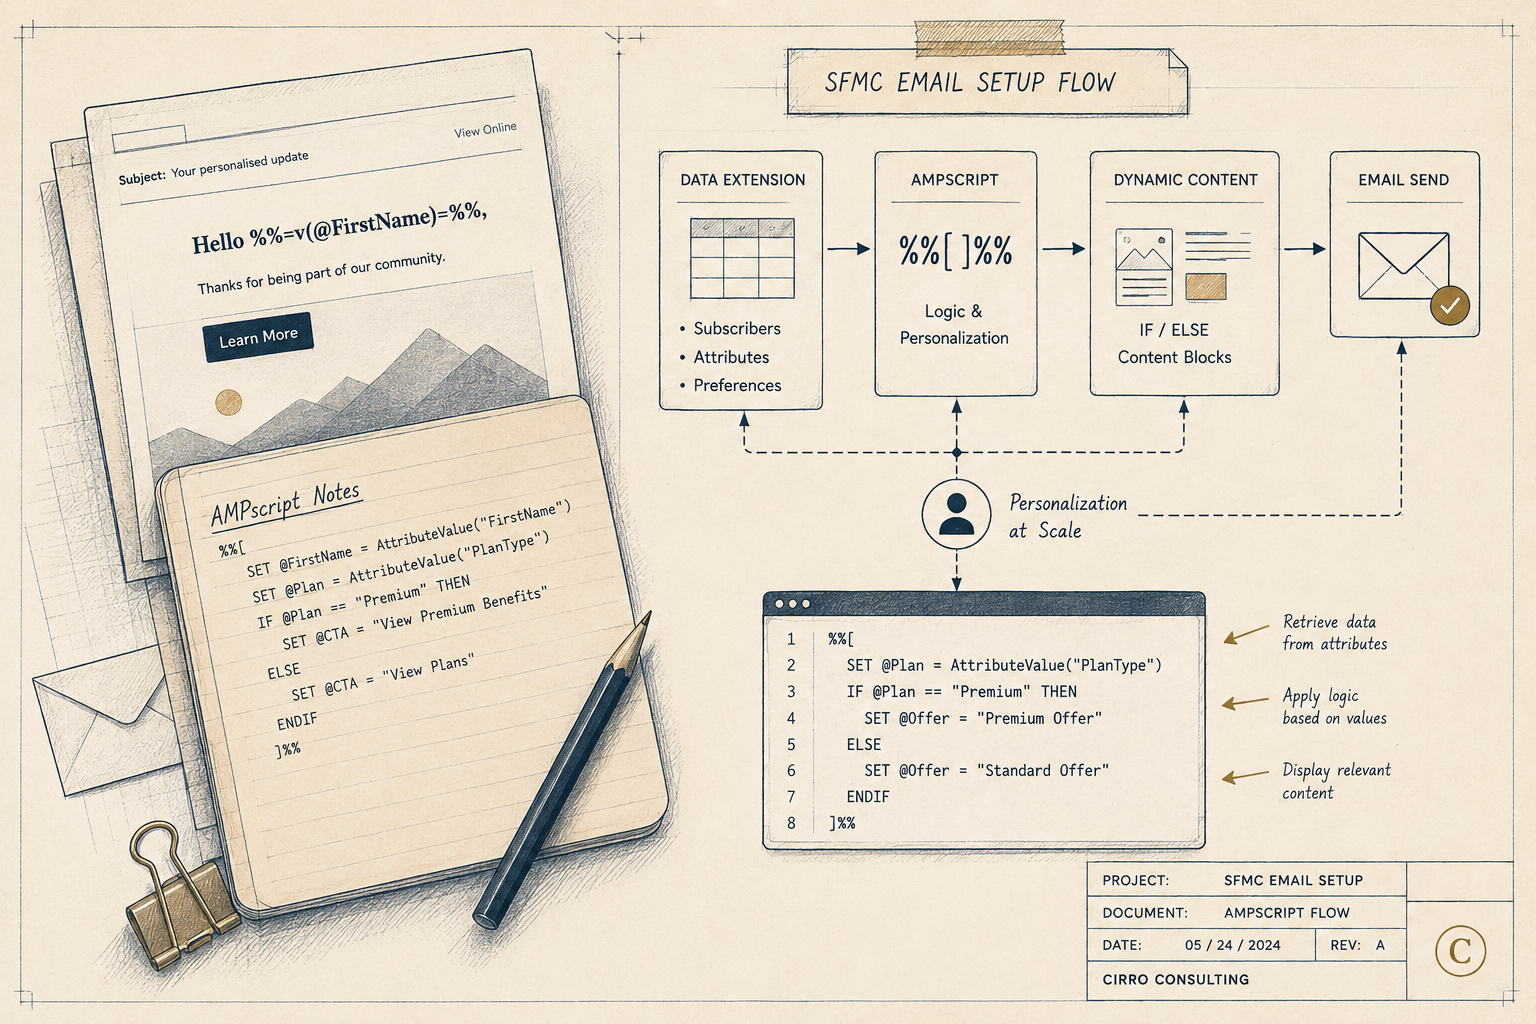
Adding AMPscript for Personalisation
To personalise content beyond merge fields, add AMPscript directly in the HTML editor. A basic personalisation example:
%%[
var @firstName
set @firstName = Lookup('Contact_Data', 'First_Name', 'Contact_Key', [ContactKey])
if Empty(@firstName) then
  set @firstName = 'there'
endif
]%%

Hi %%=v(@firstName)=%%,
For a full AMPscript walkthrough, see the AMPscript setup guide →
Step 2: Build and Manage Your Subscriber Audience
Go to Email Studio → Subscribers to manage your sending audience. SFMC supports two audience structures:
Lists — simpler, good for small subscriber bases with minimal segmentation needs.
Data Extensions — the recommended approach for any account sending at scale. Data extensions are relational tables that store subscriber attributes and can be queried with SQL for precise segmentation.
Creating a Target Audience for Your Send
To build a send audience from a data extension:
— Go to Contact Builder → Data Extensions — Select the data extension containing your target contacts — Confirm it includes the subscriber key field that maps to your All Subscribers list
For dynamic segmentation, use a Query Activity in Automation Studio to write the results of a SQL query into a sendable data extension before your send. This gives you full control over exactly who receives each campaign.
Step 3: Configure Your Send
From Email Studio → Send, click Create Send and work through the send configuration:
Select Your Email
Choose the email you created in Content Builder. Review the preview to confirm content and personalisation are rendering correctly before proceeding.
Select Your Audience
Choose the list or data extension you are sending to. If you are using multiple suppression lists — unsubscribes, hard bounces, internal test addresses — add them here as exclusions.
Configure Sender Details
- From Name — use a consistent, recognisable brand name
- From Email — must match your authenticated SAP domain
- Reply-To — set to a monitored inbox, not
noreply@
Set Subject Line and Preheader
Write your subject line and preheader text. The preheader is the text that appears after the subject line in the inbox preview — it is not optional, it is part of your open rate strategy. If you leave it blank, SFMC will pull the first line of your email body.
Schedule or Send Immediately
Choose Send Immediately or Schedule for a future date and time. For time-sensitive campaigns, schedule at least 30 minutes ahead to allow for final review. For recurring sends, use Automation Studio to schedule rather than setting individual send times manually.
Step 4: Test Before You Send
Never send without testing. Email Studio’s testing options:
Preview — renders a visual preview of the email. Use the subscriber selector to preview with a real contact record and validate that AMPscript and dynamic content are resolving correctly.
Test Send — sends the email to a specified test address. Always test send to at least two email clients — desktop and mobile — before a live send.
Inbox Preview (Litmus integration) — if your SFMC account has Litmus integrated, use it to preview rendering across Gmail, Outlook, Apple Mail, and major mobile clients before sending.
Spam Check — run a spam filter check in the send flow before finalising. Review the score and address any flagged content.
Step 5: Track and Analyse Performance
After your send completes, go to Email Studio → Tracking to review performance. Key metrics to monitor:
| Metric | What It Tells You | Benchmark |
|---|---|---|
| Delivery rate | % successfully delivered | >98% |
| Open rate | % of delivered emails opened | 20–30% varies by industry |
| Click rate | % of delivered emails clicked | 2–5% varies by industry |
| Click-to-open rate | % of openers who clicked | 10–20% |
| Bounce rate | % undelivered | Hard <2%, Overall <10% |
| Unsubscribe rate | % who opted out | <0.5% |
| Complaint rate | % marked as spam | <0.1% |
Going Deeper with Analytics Builder
For cross-campaign reporting and trend analysis, use Analytics Builder — SFMC’s reporting layer. Analytics Builder lets you build dashboards across multiple sends, track subscriber engagement over time, and export data for external analysis.
For custom segmentation and reporting, SQL Query Activity in Automation Studio can pull tracking data from SFMC’s data views — _Sent, _Open, _Click, _Bounce, _Unsubscribe — into queryable data extensions.
Step 6: Apply What You Learn
Email Studio’s tracking data is only useful if you act on it. After every send, run a brief post-send review:
— Did open rate meet benchmark? If not, test subject line and send time on next send — Did click rate meet benchmark? If not, review CTA placement, copy, and offer — Were there unexpected bounces? Investigate by ISP and address data quality issues — Any unsubscribe spikes? Check frequency and content relevance
Build this review into your standard post-send process — not as an ad-hoc activity, but as a fixed step in your campaign workflow. Over time, it compounds into meaningful performance improvement.
For a full look at the deliverability factors that affect Email Studio send performance, the SFMC deliverability guide covers every variable in detail.
Conclusion
Email Studio is straightforward once you understand how its four areas — content creation, audience management, send configuration, and tracking — connect to each other. The teams that get the most out of it are not the ones using the most advanced features. They are the ones who run a disciplined process through each step, every send.
Start with the basics in this guide, build consistency into your workflow, and layer in AMPscript personalisation and Analytics Builder reporting as your confidence grows.
If you want help setting up Email Studio for your specific use case or building your first campaign workflow, get in touch →
References: Email Studio Get Started Checklist — Salesforce Help